Swapping in a smart thermostat is one of the most popular DIY home upgrades, and for many homes it’s a 30- to 60-minute job with a screwdriver. For others, a missing power wire, a heat pump, or unusual equipment turns it into a project that’s better left to a professional. Here’s how to tell which group you’re in, what installation involves, and what it typically costs to hire it out.
Table of Contents
Can you install it yourself?
You’re a good candidate for DIY if:
- You have a standard low-voltage (24-volt) system, which covers most central furnaces, air conditioners, and heat pumps
- There’s a C-wire (common wire) at the thermostat, or your new thermostat includes an adapter
- The manufacturer’s online compatibility checker says your wiring works
- You’re comfortable turning off power and matching labeled wires to terminals
Call a pro if you have line-voltage heat such as electric baseboard heaters, a dual-fuel or multi-stage system you’re unsure about, no C-wire and no adapter option, an older thermostat that may contain mercury, or wiring that doesn’t match the checker.
DIY installation, step by step
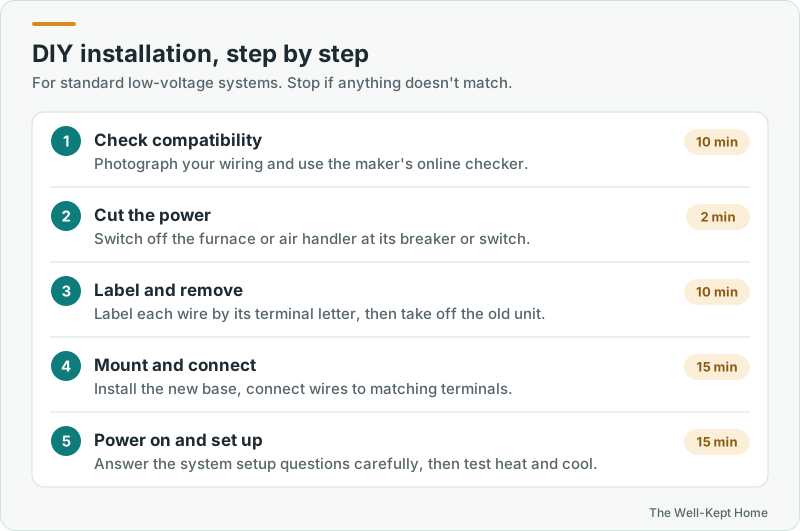
- Check compatibility. Remove the old thermostat’s cover and photograph the wires and terminal letters. Enter them into the manufacturer’s compatibility tool.
- Turn off the power to the furnace or air handler at its breaker or service switch. Confirm the old thermostat’s screen goes dark.
- Label the wires. Most new thermostats include labels. Tag each wire with the letter of the terminal it’s connected to: R, W, Y, G, C, O/B, and so on. Labels go by terminal, not wire color, since colors aren’t always standard.
- Remove the old thermostat and its base. Keep the wires from falling back into the wall; wrapping them around a pencil helps.
- Mount the new base, using a level, and connect each labeled wire to the matching terminal.
- Restore power and go through the setup questions carefully, especially system type, heat pump settings, and auxiliary heat.
- Test heating, cooling, and the fan. Then set your schedule.
The C-wire question
Smart thermostats need continuous power for Wi-Fi and the display, which usually comes from the C-wire. If you don’t have one, you have several options:
- An unused wire in the existing cable, which can sometimes be connected as a C-wire at both ends.
- An adapter or power extender kit installed at the furnace, commonly about $15 to $50 in parts. Some thermostats include one in the box.
- A new wire run by a professional, commonly about $120 to $200 depending on access.
- A thermostat designed to work without a C-wire on many common systems.
What professional installation costs
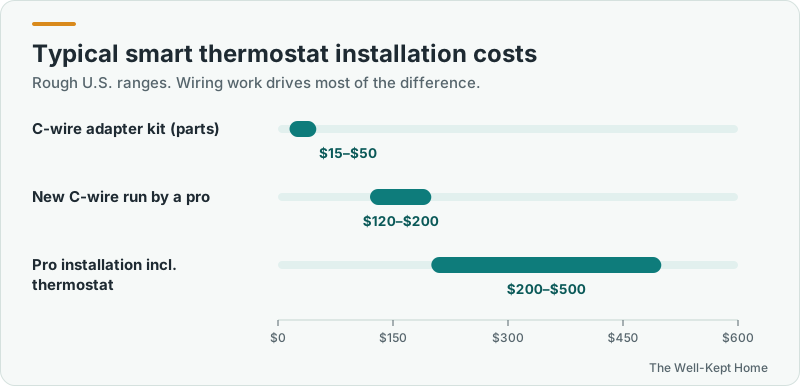
Installed costs for a smart thermostat, including the device, commonly run about $200 to $500, depending on the model and whether wiring work is needed. HVAC technicians often charge in the range of roughly $75 to $125 an hour. A simple swap may take well under an hour, while adding a C-wire or configuring a complex system takes longer. These are rough national figures; get a quote that separates the thermostat price from labor.
Who to hire
- An HVAC contractor is the best choice for heat pumps, dual-fuel, multi-stage, or zoned systems, since they can configure the equipment correctly.
- An electrician makes sense for new wiring runs and line-voltage thermostats.
- A handyman can handle straightforward swaps in many areas; check local licensing rules.
- Manufacturer and retailer programs. Some thermostat brands and big-box stores offer installation through partner professionals.
Old mercury thermostats
Older round or lever thermostats sometimes contain a small glass bulb of mercury. Don’t throw them in the trash. Many hardware stores and HVAC contractors participate in thermostat recycling programs, and your local household hazardous waste program will accept them.
After installation
- Turn on away or occupancy features and set a schedule. See the best thermostat setting for summer.
- For heat pumps, confirm auxiliary heat settings so backup heat doesn’t run unnecessarily.
- Apply for your utility’s thermostat rebate, and consider its demand-response program.
Haven’t chosen a model yet? See our guide to the best smart thermostat for saving energy.
Common questions
How long does installation take?
A straightforward DIY swap usually takes 30 to 60 minutes. A professional installation with a new C-wire may take one to two hours.
Can installing a thermostat damage my system?
Miswiring can blow a fuse on the furnace control board or cause the system to run incorrectly. That’s why turning off power, labeling wires, and checking compatibility matter. If anything looks different from the instructions, stop and call a pro.
Will my utility install it for free?
Some utilities offer free or discounted smart thermostats, sometimes with installation, especially through demand-response programs. Check your utility’s website.