Attic insulation is one of the most cost-effective energy upgrades for most homes, and it’s usually less expensive than people expect. National cost guides commonly put professionally installed blown-in insulation at roughly $1 to $4 per square foot, with typical attics often landing around $900 to $3,600 in total. Here’s what drives the price, what other costs to expect, and how to get the most for your money.
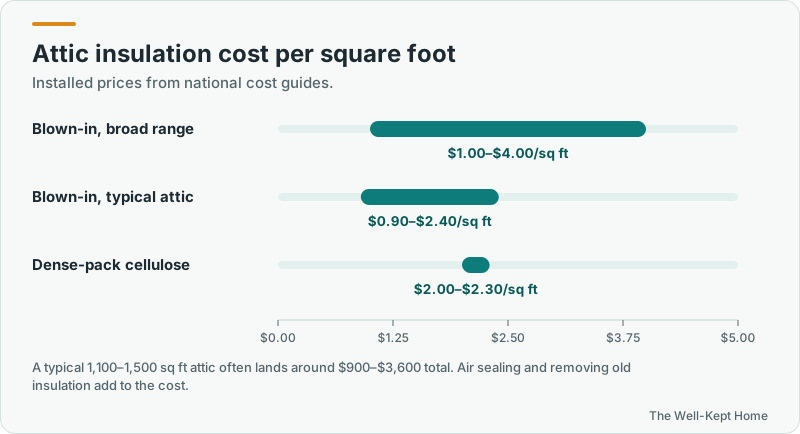
Table of Contents
Typical costs by material
Blown-in fiberglass and cellulose
Loose-fill insulation blown in with a machine is the most common choice for adding insulation to an existing attic. It fills around wires, pipes, and framing better than batts. For a typical 1,100- to 1,500-square-foot attic floor, totals commonly fall around $900 to $3,600, depending on how much is added and where you live.
Dense-pack cellulose
Cellulose packed at higher density, often used in enclosed spaces, commonly runs about $2 to $2.30 per square foot installed in cost guides.
Batts
Fiberglass or mineral wool batts work on open, unobstructed attic floors, and they’re popular for DIY. Professional installation costs are similar to blown-in for simple attics, but batts are harder to fit well around obstacles, and gaps reduce their effectiveness.
Spray foam
Spray foam insulates and air seals at the same time, and it’s typically used on the underside of the roof deck to create an unvented, conditioned attic. It usually costs several times more than blown-in insulation for the same area, so it’s most common in specific situations, such as attics containing ductwork and equipment.
What affects your price
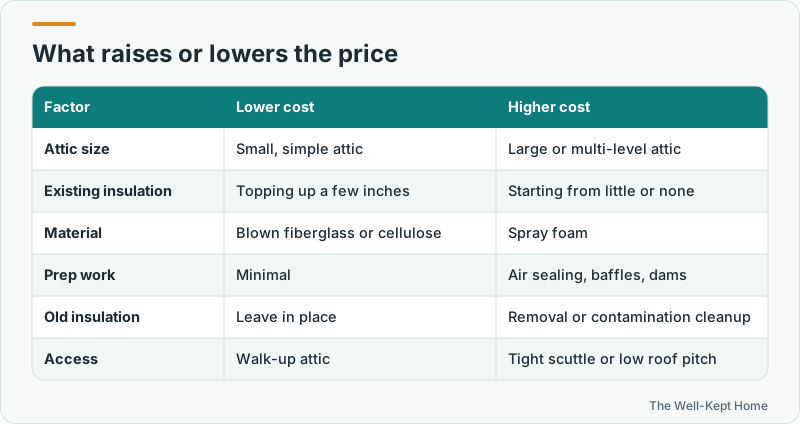
- Attic size and layout. Bigger and more complicated attics cost more.
- How much you’re adding. Topping up a few inches costs less than starting from almost nothing.
- Target R-value. ENERGY STAR recommends roughly R-30 to R-60 depending on climate, and higher targets mean more material.
- Air sealing. Well worth paying for, but it adds labor. Quotes that include it aren’t directly comparable to quotes that don’t.
- Prep work. Baffles at the eaves, dams around the hatch and chimney, and covers for recessed lights.
- Removing old insulation. Wet, moldy, or rodent-contaminated insulation must come out first, which adds significant cost. Old vermiculite that may contain asbestos requires specialized handling.
- Access. Small scuttle holes, low roof pitches, and tight spaces slow the work.
- Region. Labor costs vary by area.
Rebates and incentives
The federal tax credit that covered 30% of insulation costs ended for projects placed in service after 2025. Utilities and state programs still offer incentives in many areas, and insulation is often among the most generously rebated upgrades. Check before signing a contract, since many programs require an approved contractor or pre-approval. See energy efficiency rebates for homeowners.
Is it worth it?
For most under-insulated homes, yes. ENERGY STAR estimates that homeowners can save an average of 15% on heating and cooling costs by air sealing and adding insulation in attics, floors over crawlspaces, and accessible basement rim joists. Payback periods are often shorter than for bigger-ticket upgrades like windows. The comfort benefits, such as more even temperatures upstairs and fewer ice dams, come immediately.
DIY or hire a pro?
Blowing insulation yourself can cut the cost substantially, and some home improvement stores lend insulation blowers free with a minimum purchase. It’s dusty, hot, cramped work, though. You need a respirator, goggles, and long sleeves, you must walk only on the joists, and you need to know where to keep insulation away from heat sources. Air sealing before you blow insulation is the step DIYers most often skip, and it makes a big difference. If your attic is hard to access, has vermiculite or contamination, or needs significant air sealing, hire a pro. See attic insulation installation for what a good job looks like.
How to get a fair price
- Get at least three quotes with the same scope and target R-value.
- Ask each contractor to itemize air sealing, prep work, insulation, and removal.
- Ask for the material, the installed depth, and the final R-value in writing.
- Consider an energy audit first; it can identify which upgrades matter most. See home energy audit costs.
Common questions
How long does attic insulation last?
Properly installed insulation that stays dry can last for decades. Blown-in insulation can settle a little over time, which is why installers often add a bit more than the target depth.
Is cellulose or fiberglass better?
Both work well when installed correctly. Cellulose is denser and has a slightly higher R-value per inch; fiberglass is lighter and resists moisture. The installation quality matters more than the choice between them.
Does more insulation always help?
Up to the recommended level for your climate, yes. Beyond that, each additional inch saves less. Air sealing usually delivers more benefit than going far past the recommended level.