If your upstairs rooms are hot in summer and cold in winter, or you can see the tops of the ceiling joists when you look into your attic, adding insulation is likely one of the best-value upgrades you can make. It’s also a job where the quality of the installation matters as much as the material. Here’s how a good contractor approaches it, what R-value to aim for, and how to choose an installer.
Table of Contents
Signs you need more attic insulation
- The insulation is level with or below the tops of the floor joists. ENERGY STAR’s rule of thumb is that if you can see the joists, you probably need more.
- Upstairs rooms are noticeably warmer in summer and colder in winter than the rest of the house.
- Ice dams form along the roof edges in winter, a sign of heat escaping into the attic.
- Energy bills are high for the size of the home.
- The insulation is old, compressed, wet, or contaminated by rodents.
How much insulation do you need?
Insulation is rated by R-value, its resistance to heat flow. ENERGY STAR recommends attic insulation levels of roughly R-30 to R-60, depending on your climate zone, with the higher levels for colder regions. Many older homes have far less. A contractor or energy auditor can tell you your current level and the target for your area.
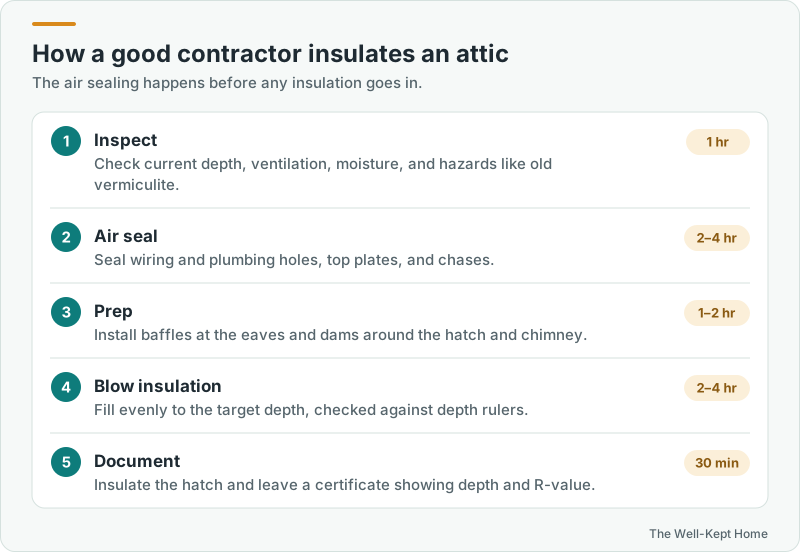
How a good contractor does the job
1. Inspection
The contractor checks the current insulation depth, attic ventilation, signs of moisture or roof leaks, bathroom fans venting into the attic instead of outdoors, and any hazards. Old vermiculite insulation, a pebbly gray-brown material, may contain asbestos. The EPA advises leaving it undisturbed and having a professional handle it.
2. Air sealing
This is the step that separates a great job from a mediocre one. Before adding insulation, the contractor seals the holes in the attic floor: wiring and plumbing penetrations, the tops of interior walls, chases, and gaps around the chimney, which require metal flashing and fire-rated sealant rather than foam. Insulation slows heat transfer, but it doesn’t stop air from moving, so sealing first makes the insulation far more effective.
3. Preparation
Baffles go in at the eaves to keep soffit vents open so the attic can breathe. Dams go around the attic hatch and around chimneys and non-insulation-rated light fixtures to keep insulation a safe distance from heat sources.
4. Installation
Blown-in fiberglass or cellulose is spread evenly to the target depth, measured against depth rulers stapled to the framing. Batts may be used on open, unobstructed attic floors.
5. Finishing
The attic hatch gets weatherstripping and a rigid foam board on top. Under the Federal Trade Commission’s R-value rule, installers must give you a receipt or certificate showing the type of insulation, its thickness, coverage area, and R-value. Many also post a card in the attic.
How to choose an insulation contractor
- Get at least three quotes and make sure each one includes the same scope: air sealing, baffles, target R-value, and cleanup.
- Ask whether air sealing is included and what it covers. A quote that skips it isn’t comparable to one that includes it.
- Ask about the material, the brand, and the installed depth needed to reach the target R-value.
- Look for credentials such as Building Performance Institute certification, and check licensing and insurance.
- Use a utility-approved contractor if you want a rebate; many programs require it. See energy efficiency rebates for homeowners.
- Ask for the certificate showing depth and R-value when the job is done.
What it costs
Blown-in attic insulation is one of the more affordable energy upgrades, typically priced per square foot. Our guide to attic insulation costs breaks down typical prices and what changes them.
How to prepare
- Clear stored items away from the attic access and out of the attic if possible.
- Point out any known roof leaks, pest problems, or areas that are hard to reach.
- Plan for some dust near the hatch; good crews cover the floor and clean up.
Common questions
Can new insulation go on top of the old?
Usually, yes, as long as the old insulation is dry, free of mold and pest contamination, and isn’t vermiculite. Wet or contaminated insulation should be removed first.
How long does installation take?
Many attics are done in a day, including air sealing. Larger or complicated attics may take longer.
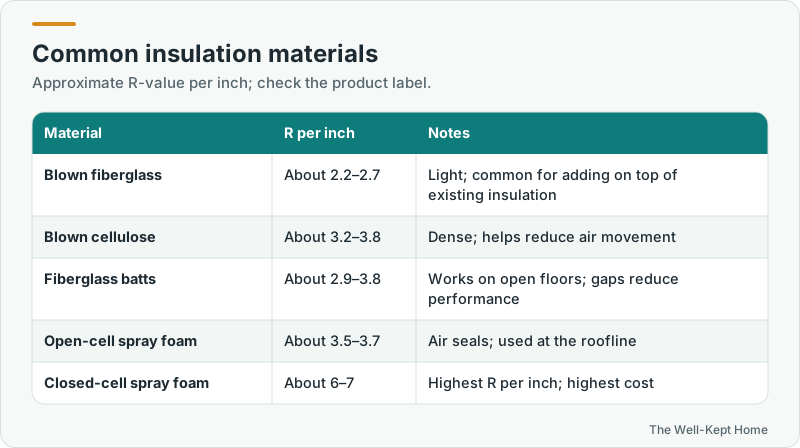
Is spray foam better than blown-in?
Spray foam both insulates and air seals, and it’s often used at the roofline for unvented attics. It also costs considerably more. For a conventional vented attic, air sealing plus blown-in insulation is usually the most cost-effective choice.