Weatherstripping is one of the cheapest home improvements you can make, and one of the most noticeable. A few dollars of material and an afternoon of work can stop the cold draft under the front door, the whistle around a bedroom window, and some of the heated or cooled air slipping out of your house. The key is choosing the right type for each gap, because there’s no single weatherstrip that works everywhere.
Table of Contents
How to choose weatherstripping
Two questions decide the material:
- How big and how even is the gap? Measure it, or note where light shows through.
- How do the surfaces move? Some gaps close by compression, like a door pressing against its frame. Others slide past each other, like the sashes of a double-hung window. Compression seals and sliding seals need different materials.
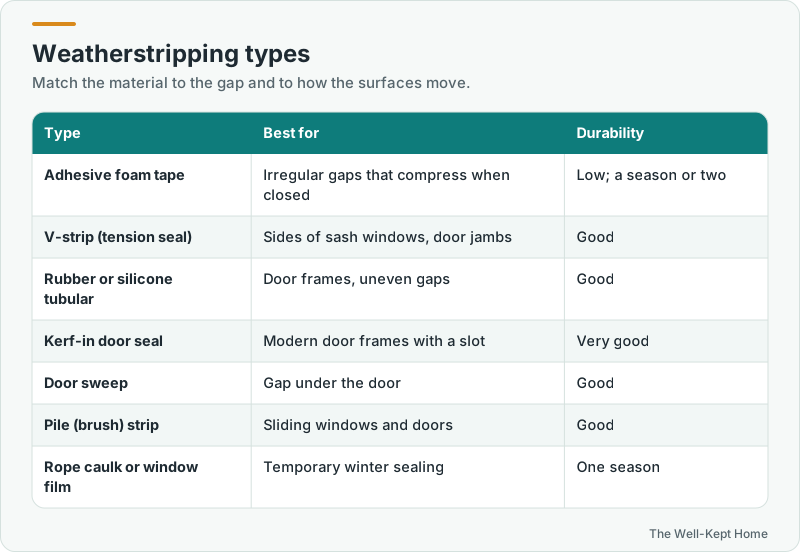
The main types
- Adhesive foam tape. Cheap and easy for irregular gaps that compress, such as the top of a window sash. It wears out quickly and doesn’t hold up where things slide.
- V-strip, or tension seal. A folded strip of vinyl or metal that springs open to fill the gap. Good for the side channels of sash windows and the jambs of doors.
- Rubber or silicone tubular gaskets. Hollow tubes that compress to fill uneven gaps on door frames. Durable and effective.
- Kerf-in door seals. Most modern exterior door frames have a narrow slot, the kerf, that holds a foam or rubber seal. Replacements press right in.
- Door sweeps and door shoes. Attach to the bottom of the door to close the gap above the threshold.
- Pile (brush) weatherstripping. Fuzzy strips used on sliding windows and patio doors.
- Temporary options. Rope caulk and shrink-film window kits seal drafty windows for a season and come off cleanly in spring.
Weatherstripping an exterior door
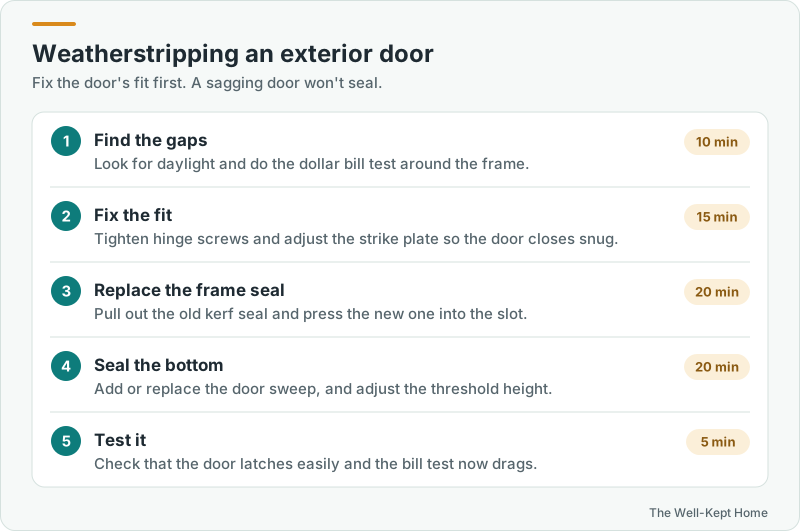
- Find the gaps. Close the door and look for daylight around the frame and at the bottom, ideally with the outside light on and the inside dark. Do the dollar bill test at several spots: close the door on a bill and pull. If it slides out with no drag, the seal isn’t touching.
- Fix the fit first. A door that sags won’t seal no matter how good the weatherstripping is. Tighten the hinge screws, replacing a short screw in the top hinge with a longer one that reaches the framing, and adjust the strike plate so the door pulls snug against the stop.
- Replace the frame seal. On doors with a kerf, pull the old seal straight out, take a piece to the hardware store to match the profile, and press the new one into the slot with your fingers or a putty knife. On older doors, attach tubular or V-strip weatherstripping to the stop with small nails or screws.
- Seal the bottom. Replace a worn sweep, or add one. Cut it to the door’s width and screw it to the inside face so the flexible edge just touches the threshold. Many thresholds have screws that raise or lower the top; adjust it until a sheet of paper drags when you pull it out from under the closed door.
- Test it. The door should latch without slamming. If it’s hard to close, the seal is too thick or the threshold is too high.
Weatherstripping windows
- Double-hung windows: V-strip in the side channels, a compressible foam or rubber strip on the bottom of the lower sash and the top of the upper sash, and a seal at the meeting rail where the two sashes overlap.
- Casement and awning windows: compression gaskets around the frame where the sash closes.
- Sliding windows and doors: pile weatherstrip in the tracks and along the meeting edges.
Installation tips
- Clean surfaces thoroughly and let them dry before applying adhesive products. Many adhesives need temperatures above roughly 40°F to 50°F to stick well, so check the package.
- Measure twice and cut long pieces in single runs to avoid gaps at joints.
- Don’t seal operable windows shut, especially bedroom windows that serve as emergency exits.
- Don’t overdo thickness. A seal that’s too thick strains latches and hinges.
How long weatherstripping lasts
Foam tape may last a season or two. Quality vinyl, rubber, and silicone seals last several years. Check every fall: if a seal is cracked, flattened, or no longer touching, replace it.
Weatherstripping is just one part of sealing a house. The biggest leaks are often in the attic and basement; see how to find air leaks in your house. For more ways to cut winter bills, see how to lower your heating bill in winter.
Common questions
How much can weatherstripping save?
It depends on how leaky your doors and windows are. The bigger benefit is often comfort: fewer drafts near doors and windows, which can let you keep the thermostat a little lower.
Can I weatherstrip in winter?
Yes, but adhesive products may not stick well in the cold. Mechanical options, such as door sweeps and kerf-in seals, work in any weather.
Should renters weatherstrip?
Removable options, such as door draft stoppers, rope caulk, and window film kits, are renter-friendly. For permanent fixes, ask the landlord; see energy saving tips for apartments.